

Receiving a new pair of pointe shoes is a rite of passage for any ballet dancer. The pristine satin, the smell of the paste, and the promise of grace they hold are undeniably exciting. However, unlike almost any other athletic shoe, a pointe shoe is not ready to wear straight out of the box. Before a dancer can even attempt a relevé, the shoes must be customized to their feet. This customization process is a personal ritual, and the most critical part of it is sewing the ribbons and elastics.

To the uninitiated, sewing ribbons might seem like a simple chore, akin to lacing up a sneaker. In reality, it is a precise anatomical adjustment. The placement of the ribbons and elastics determines how the shoe clings to the arch, how much support the ankle receives, and ultimately, whether the dancer is safe from injury. A poorly sewn ribbon can snap mid-performance or fail to support the ankle, leading to disastrous consequences. Conversely, a perfectly placed set of elastics can make the shoe feel like an extension of the dancer’s own skin.
This article serves as your comprehensive guide on how to sew pointe shoes correctly. We will move beyond the basics of threading a needle and delve into the biomechanics of placement. We will explore how to find your unique arch position, the differences between single and crisscross elastics, and the techniques used by professionals to ensure their shoes are secure. Whether you are a first-time pointe student or a parent helping out, this guide will turn a daunting task into a manageable skill.
The Anatomy of Attachment: Why Sewing Matters
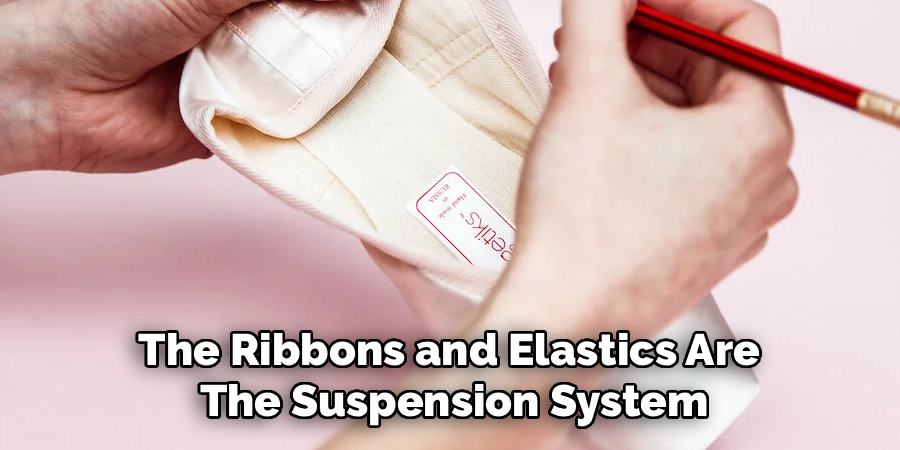
Before you make your first stitch, it is vital to understand the function of the components you are attaching. A pointe shoe is a rigid structure designed to support the entire body weight on the tips of the toes. The ribbons and elastics are the suspension system that keeps this structure aligned with the foot.
The Function of Ribbons
Ribbons are primarily responsible for securing the heel of the shoe against the foot and providing lateral stability to the ankle. When you rise onto pointe, the heel of the shoe naturally wants to slip off. The ribbons, wrapped around the ankle, counteract this force. They also provide a visual line, extending the look of the leg and creating the seamless aesthetic that ballet demands.
The Role of Elastics
While ribbons provide security, elastics provide the fit. As the foot moves from flat to pointe, the arch changes shape dramatically. Elastics, usually sewn near the heel, pull the satin material of the shoe up into the arch of the foot. This prevents the shoe from gaping at the sides and ensures that the shank (the stiff insole) stays in contact with the sole. Without elastics, a shoe can feel disconnected and clunky; with them, the shoe hugs the foot through every range of motion.
Essential Tools for the Job
Sewing pointe shoes requires a specific toolkit. Using the wrong thread or needle can make the job significantly harder and result in less secure attachments. You want materials that are durable enough to withstand the immense tension placed on the shoe during dance.
Heavy-Duty Thread and Needles
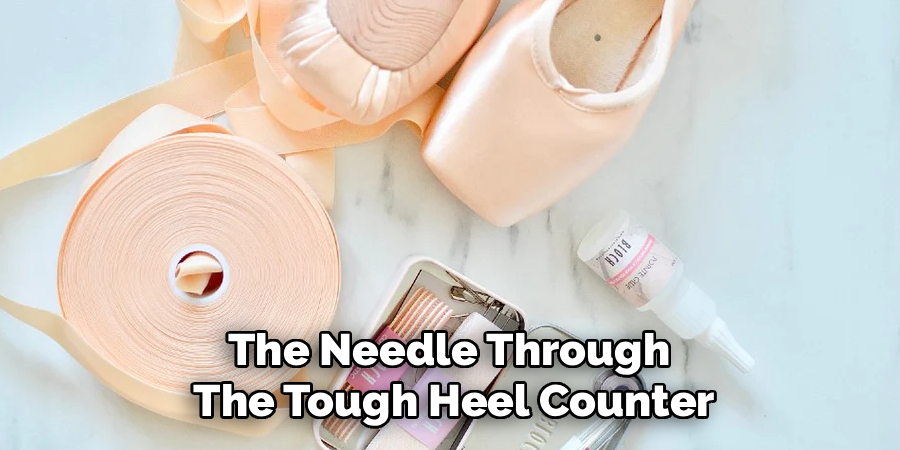
Standard cotton sewing thread is often too weak. It can snap under the pressure of a deep plié. Instead, opt for waxed dental floss or a heavy-duty upholstery thread. Dental floss is a favorite among professionals because it is incredibly strong, cheap, and grips the teeth well. Pair this with a sturdy needle that has an eye large enough for your thread but is sharp enough to pierce thick canvas and satin. A thimble is also highly recommended to protect your fingers when pushing the needle through the tough heel counter.
The Ribbons and Elastics
Most pointe shoes are sold without ribbons attached. You will need to purchase a set of satin ribbons (usually about 2.5 yards long) and elastic (either ¾ inch or 1 inch wide). Many dancers prefer “invisible” mesh elastic because it blends better with tights, while others prefer the sturdy support of thick fabric elastic.
Scissors and a Lighter
Sharp fabric scissors are essential for cutting your ribbons cleanly. You will also need a lighter or clear nail polish to treat the cut ends of the ribbons, preventing them from fraying into a mess of loose threads.
Finding Your Perfect Placement
The most common mistake beginners make is sewing the ribbons in a generic spot. There is no universal “correct” spot; the placement depends entirely on the unique anatomy of your foot. If you sew them too far forward, they won’t pull the shoe up correctly. Too far back, and they will slip off your heel.
The Fold Method
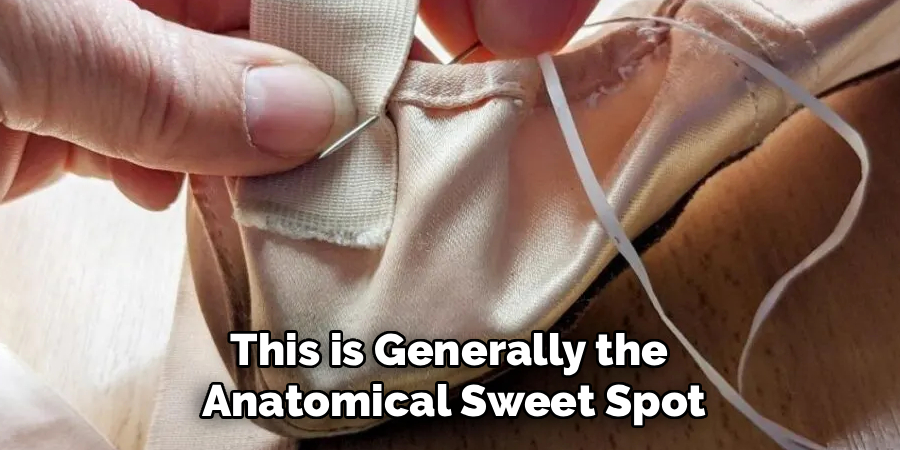
To find the ideal spot for your ribbons, fold the back heel of the shoe forward against the inner sole. The fold should flatten the heel against the shank. Draw a line or make a mark with a pencil right where the fold creates a crease in the side of the shoe. This crease usually sits at the highest point of your arch. This is generally the anatomical sweet spot where the ribbons will provide the most effective lift and support.
The Arch Test
Alternatively, put the shoe on your foot. Stand flat and locate the highest point of your arch. Mark this spot on the inner and outer sides of the shoe with a pencil. This is where the ribbons should be anchored to pull the shoe flush against your skin when you point your foot. Note that this spot might be slightly different on your left foot versus your right foot.
The Primary Method: How to Sew Pointe Shoes (Ribbons)
Once you have marked your placement, it is time to sew. This process creates the primary support system for your ankle.
Step 1: Prepare the Ribbons
Take your long length of ribbon and cut it into two equal pieces—one for each shoe. Then, cut each of those pieces in half again, so you have four equal lengths (two for the left shoe, two for the right). Take your lighter and quickly run the flame over the cut ends to melt the fibers and seal them. This prevents fraying.
Step 2: Positioning the Ribbon
Take one piece of ribbon and fold the end over about half an inch to create a double layer. This adds strength to the attachment point. Place this folded end inside the shoe at your marked spot. It should be sewn against the cotton lining, not just the satin exterior. Ensure the ribbon is angled slightly forward. A 45-degree angle is usually ideal, as it allows the ribbon to lie flat across the top of the foot without twisting.
Step 3: Stitching for Security
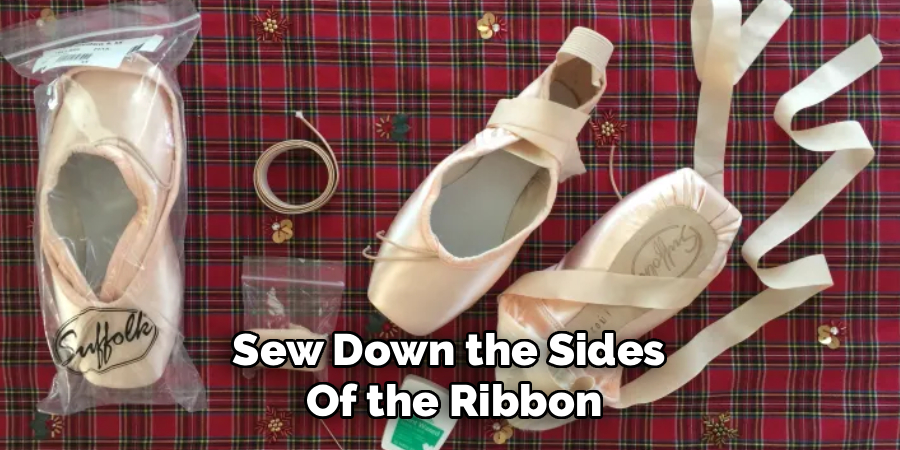
Using your heavy-duty thread or dental floss, begin stitching. Do not sew all the way through the satin to the outside of the shoe; this ruins the clean line. Instead, catch the canvas lining and the internal layer of the satin. Use a whip stitch (looping over the edge) or a running stitch in a square pattern with an ‘X’ in the middle. This distributes the tension and prevents the ribbon from ripping out. Ideally, sew down the sides of the ribbon as well as the bottom to anchor it firmly.
Step 4: Repeat for All Four Sides
Repeat this process for the other side of the shoe and then for the second shoe. Remember to check the angle before you commit to the stitches. A ribbon angled too far back will cut into your ankle; one angled too far forward will be loose.
Securing the Elastics: The Crisscross vs. Single Loop
While ribbon placement is fairly standard, elastic placement is a matter of preference and foot shape. There are two main methods: the single loop and the crisscross.
The Single Loop Method
This is the simplest method and works well for dancers with lower arches. Take a piece of elastic and sew one end to the back of the heel, right next to the back seam of the shoe. Stretch the elastic across the ankle to the other side of the heel seam and sew it down. This creates a simple loop that goes around the front of the ankle, keeping the heel of the shoe from slipping off.
The Crisscross Method
This is the preferred method for dancers with high arches or “banana feet.” It involves two pieces of elastic per shoe.
- Anchor at the Heel: Sew one end of each elastic piece to the back of the heel, on either side of the back seam.
- Cross and Anchor: Take the elastic from the inner heel, pull it across the top of the foot, and anchor it near the ribbon attachment on the outside of the shoe. Do the same with the other elastic, crossing it to the inside.
- Tension is Key: Before sewing the front ends, put the shoe on and pull the elastics tight to check the tension. They should be tight enough to pull the shoe into your arch but not so tight that they cut off circulation.
Professional Tips for a Clean Finish
Professional dancers sew hundreds of pairs of shoes in their careers, and they have developed tricks to make the process faster and more effective.
Sewing Through the Binding
When sewing ribbons, try to catch the drawstring casing (the binding) at the top of the shoe with your needle, but be extremely careful not to sew through the drawstring itself. If you sew through the drawstring, you won’t be able to adjust the tightness of the shoe later. Anchoring to the binding adds significant structural integrity to your sewing.
The “Hidden” Knot
When you finish sewing a section, tie your knot securely on the inside of the shoe, between the ribbon and the lining. This prevents the knot from rubbing against your skin and causing blisters. If you are using dental floss, you can carefully melt the end of the knot with a lighter to ensure it never comes undone.
Avoiding the “Baggy” Heel
If you find that the heel of your shoe is baggy even with elastics, you can use a sewing technique to fix it. Pinch the excess fabric at the heel of the shoe (on the outside). Sew this pinched closed using a whip stitch. This effectively takes in the fabric, making the heel cup tighter and more secure.
Troubleshooting Common Sewing Mistakes
Even experienced dancers sometimes get it wrong. Here are common issues and how to fix them.
Ribbons That Cut Circulation
If your ribbons hurt the front of your ankle when you plié, you likely sewed them too far back or at the wrong angle. They need to be moved slightly forward so they sit flush against the instep rather than cutting into the tendon.
Elastics That Are Too Loose
If your shoe gapes at the sides when you point your foot, your elastics are too loose or placed incorrectly. They need to be tightened. Don’t be afraid to rip out the stitches and re-sew them tighter. The elastic should be actively working to pull the shoe against your foot.
Stitching That Shows
If you can see your stitches on the outside of the pink satin, you are sewing too deeply. You must learn to separate the layers of the shoe fabric with your needle. Catch only the lining and the inner interface of the satin. This takes practice but results in a seamless, professional look.
Maintenance: Checking Your Sewing
Sewing isn’t a “set it and forget it” task. The immense force exerted on pointe shoes means that threads can loosen over time. Make it a habit to check your ribbons and elastics before every class. Give them a firm tug. If you see any daylight between the ribbon and the shoe, or if a stitch looks loose, reinforce it immediately. Dancing on a shoe with a loose ribbon is a safety hazard; if it snaps while you are en pointe, it can result in a severe ankle sprain.
Conclusion
Sewing your pointe shoes is the first step in the partnership between a dancer and their instrument. It is a quiet, meditative task that prepares you for the physical exertion to follow. By taking the time to find your correct placement, using the right materials, and securing your ribbons and elastics with care, you are laying the foundation for safe and beautiful dancing.
Knowing how to sew pointe shoes is an essential skill that evolves with you. As your feet strengthen and your technique changes, you may find yourself adjusting your placement or trying new elastic configurations. Embrace this process of customization. A shoe that is sewn with care and attention to detail will always serve you better, allowing you to focus entirely on the movement, confident in the support beneath you.
About
As the lead voice behind Shoenify, I bridge the gap between footwear aesthetics and technical performance. With a career dedicated to the intersection of fashion and function, I provide readers with data-driven reviews and deep dives into the global footwear market. My mission is to help every reader find the perfect fit, whether they are hitting the track or the boardroom.
Education RMIT University
-
RMIT University: Bachelor of Design (Footwear & Accessories)
-
Nottingham Trent University: MA in Fashion Design (Specializing in Footwear Innovation)
Publications and Impact
My insights on footwear trends and sustainable manufacturing have been featured in leading industry trade journals. Through Shoenify, I have influenced thousands of purchasing decisions by prioritizing transparency and rigorous testing. My work focuses on the evolution of “smart” footwear and the impact of 3D printing on the future of the industry.