
Loafers are the quintessential blend of comfort and style, effortlessly bridging the gap between casual wear and formal attire. Whether you wear them daily to the office or save them for special weekend outings, keeping them pristine is essential for maintaining their sophisticated look and ensuring their longevity.

Unfortunately, many people neglect proper shoe care, allowing dirt and grime to degrade the material over time, which can ruin a perfectly good pair of shoes. By following a consistent cleaning routine, you not only preserve the appearance of your footwear but also protect your investment for years to come. In this guide on how to clean Loafers, we’ll go over the step-by-step process for keeping your shoes in tip-top shape.
Identify the Material of Your Loafers
Before you grab a brush or apply any cleaning solution, it is absolutely critical to correctly identify the material your loafers are made from. Leather, suede, nubuck, and canvas all react differently to water, oils, and chemical cleaners; using the wrong product on a sensitive material like suede can cause irreversible damage, such as staining or matting the nap.
For instance, smooth leather requires conditioning to prevent cracks, whereas patent leather needs specific products to maintain its high-gloss shine without fogging up. Checking the manufacturer’s label inside the shoe or on the original box will guide you toward the safest cleaning method. Understanding these material nuances ensures you don’t accidentally ruin the texture or color while trying to improve it.
Tools and Supplies You’ll Need
- Soft-bristle brush (horsehair is ideal for leather)
- Suede brush and eraser (specifically for suede or nubuck)
- Microfiber cloths or soft cotton rags
- Mild soap or specialized shoe cleaner
- Shoe conditioner (for leather)
- Shoe polish or wax (matching color or neutral)
- Waterproofing spray or protector
- Shoe trees (cedar is best for moisture absorption)
- Small bowl of warm water
- White vinegar (for salt stains)
7 Simple Step-by-step Guidelines on How to Clean Loafers
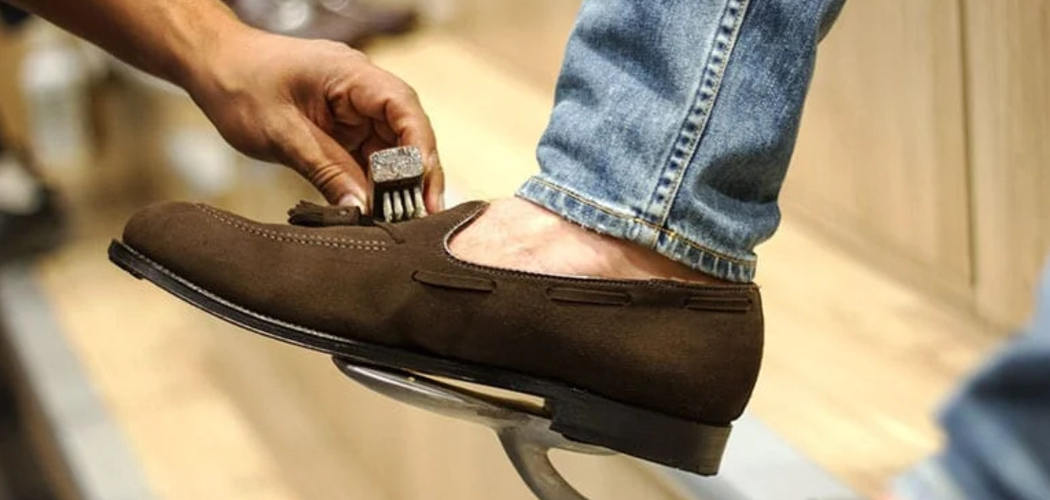
Step 1: Remove Loose Dirt and Debris
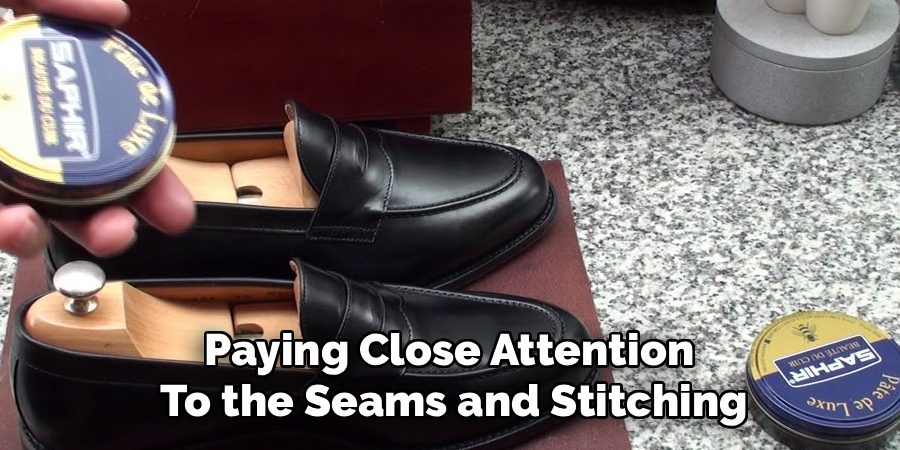
The very first step in the cleaning process is arguably the most important because it sets the stage for a safe deep clean. Take your loafers outside or over a trash bin and gently knock the soles together to dislodge any large chunks of dried mud or dirt stuck in the treads. Once the heavy debris is gone, use a soft-bristle brush (or a specialized suede brush if applicable) to sweep away fine dust from the uppers, paying close attention to the seams and stitching where grime likes to hide.
If you skip this initial dusting and go straight to applying liquid cleaners, you risk mixing the surface dirt with the solution, essentially creating an abrasive mud that you then rub into the material. This can cause micro-scratches on smooth leather or push dirt deeper into the fibers of suede and canvas. Taking the extra time to dry brush ensures that you are cleaning the material itself, not just moving dirt around, resulting in a much more effective and safer cleaning session.
Step 2: Clean the Soles Thoroughly
Your soles take the brunt of the daily wear and tear, accumulating everything from gum to gravel, so they require a bit more elbow grease than the delicate uppers. Mix a small amount of mild dish soap with warm water and use a stiffer brush, like an old toothbrush or a dedicated sole brush, to scrub the rubber or leather bottoms vigorously. Focus on the heel stack and the welt—the area where the sole connects to the upper—as this area often collects mud that can degrade the stitching over time.
Be careful not to let the soapy water splash onto the upper material, especially if you are cleaning suede or unsealed leather, as this could cause water spots. Once you have scrubbed away the grime, wipe the soles down with a damp cloth to remove any soapy residue. Cleaning the soles not only makes the shoes look newer from every angle but also prevents you from tracking dirt into your home or closet later.
Step 3: Prepare the Cleaning Solution and Test
Now that the surface dirt is gone, it is time to prepare the appropriate cleaning agent for your specific loafer material. For smooth leather, a dedicated leather cleaner or a very mild soap solution works best; for suede, you might need a vinegar-water mix or a specialized foam cleaner. Before applying the solution to the entire shoe, find a small, inconspicuous area—like the back of the heel or the inner side of the tongue—and test the product there first.
Wait a few minutes to see if the material changes color, stains, or reacts negatively to the cleaner. This precaution is vital because even “safe” cleaners can sometimes darken certain leathers or alter the texture of fabrics. If the test spot looks good after drying, you can proceed with confidence. This step might seem tedious, but it is the best insurance policy against ruining a favorite pair of shoes with an incompatible chemical reaction.
Step 4: Clean the Uppers Gently
Dip a soft cloth or a sponge into your cleaning solution, wringing it out so it is damp but not soaking wet, and begin to wipe down the uppers. For leather, use gentle circular motions to lift stains and accumulated oils, working section by section so the soap doesn’t dry on the surface. If you are cleaning suede, avoid saturating the material; instead, lightly dampen the surface and use a brush to lift the nap while cleaning.
It is crucial to be gentle during this phase; aggressive scrubbing can strip the dye from leather or damage the fibers of fabric loafers. If you encounter stubborn stains, apply a little more pressure or use a targeted stain remover, but always prioritize patience over force. Remember to clean both shoes simultaneously to ensure they look uniform when they dry. If one shoe gets a deeper clean than the other, you might end up with mismatched shades.
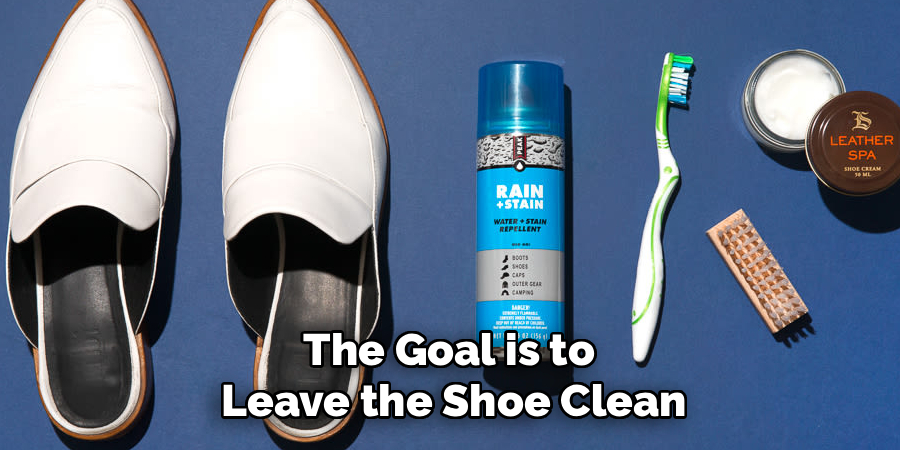
Step 5: Rinse and Remove Soap Residue
After scrubbing the uppers, you must remove all traces of the cleaning agent to prevent the material from drying out or becoming sticky. Take a fresh, clean microfiber cloth, dampen it with plain water, and wipe down the entire shoe to lift away the soap and dirt. You may need to rinse your cloth several times during this process to ensure you aren’t just redepositing the cleaning solution back onto the shoe.
Leaving soap residue on leather can lead to cracking over time as the chemicals break down the natural oils, while residue on suede can leave a white, chalky film once it dries. Be thorough but careful not to soak the leather, as excessive water can cause it to warp or stretch. The goal is to leave the shoe clean and pH-neutral, ready for the conditioning and drying phases that follow.
Step 6: Air Dry Properly
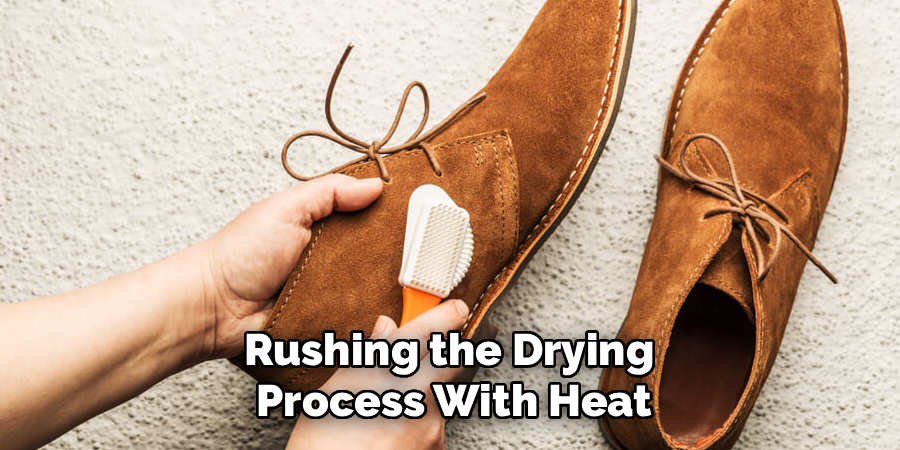
Drying your loafers correctly is just as important as cleaning them; improper drying can undo all your hard work and permanently damage the shape. Stuff the shoes with crumpled newspaper or insert cedar shoe trees to help them retain their form and absorb internal moisture while they dry. Place the loafers in a cool, well-ventilated area away from direct sunlight and direct heat sources like radiators or hair dryers.
Heat is the enemy of wet leather; it causes the fibers to shrink rapidly, leading to cracks, brittleness, and warping that cannot be fixed. Allow the shoes to dry naturally for at least 24 hours. If you used a newspaper, check it after an hour or two; if it’s soaked, replace it with dry paper to speed up the process safely. Patience here ensures the leather remains supple and the glues holding the shoe together remain intact.
Step 7: Condition and Restore
Once your loafers are completely dry, the leather will likely feel a bit dry due to the cleaning process removing some natural oils. Apply a high-quality leather conditioner using a soft cloth, massaging it into the leather in small circular motions to nourish the fibers and restore flexibility. For suede or nubuck, this step involves using a clean suede brush to fluff up the nap, which may have become matted during cleaning.
Let the conditioner sit for about 10 to 20 minutes so it can penetrate deep into the pores of the leather, then buff off any excess with a clean cloth. This step is essential for preventing creases and keeping the leather soft and comfortable to wear. Think of conditioner for your shoes like moisturizer for your skin; without it, the material becomes prone to aging and damage much faster. This final restorative step brings back the rich color and luster of your loafers.
Following these steps on how to clean Loafers will not only keep them looking their best, but also help extend their lifespan.
Common Cleaning Mistakes to Avoid
One of the most frequent errors is over-wetting the shoes, which can warp the leather and cause rot in the stitching. Another common mistake is using harsh chemicals like bleach or acetone, which strip color and destroy finishes instantly.
Many people also neglect to remove the laces or hardware, leading to rust stains or missed dirty spots. Finally, rushing the drying process with heat is a guaranteed way to crack your leather permanently.
How Often Should You Clean Loafers?
The frequency of cleaning largely depends on how often you wear your loafers and the environments you expose them to. For daily wearers, a quick brush-down should happen every evening, while a deeper clean and condition is recommended once every two to four weeks. If you only wear them occasionally for formal events, a thorough cleaning and conditioning every few months or before storage is sufficient.
However, if your loafers get wet or muddy, you should clean them immediately rather than sticking to a schedule, as leaving contaminants on the material allows damage to set in.
Storage Tips After Cleaning
Proper storage is the final piece of the maintenance puzzle, ensuring your loafers stay in shape when not in use. Always use cedar shoe trees, as they maintain the structural integrity of the toe box and heel while absorbing residual moisture and odors.
Store your loafers in dust bags made of breathable cotton to protect them from dust and sunlight, which can fade the color over time. Keep them in a temperature-controlled environment, avoiding damp basements or hot attics, to prevent mold growth or leather desiccation.
Frequently Asked Questions
Q1: Can I Put My Loafers In The Washing Machine?
A1: No, you should never put leather or suede loafers in the washing machine because the total submersion in water and the aggressive agitation cycle will destroy the material. The water will strip all natural oils, leading to severe cracking and shrinking, while the tumbling action can break the internal structure and sole bonding. Even canvas loafers are better cleaned by hand to preserve their shape and glue integrity.
Q2: How Do I Remove Salt Stains From Leather Loafers?
A2: Salt stains from winter sidewalks can be removed effectively by mixing a solution of one part white vinegar and two parts water. Dip a clean cloth into this mixture and gently wipe the salt-stained areas until the white residue disappears. Once the salt is gone, wipe with a damp cloth to remove the vinegar, dry the shoes properly, and immediately apply conditioner to replenish the moisture the salt and vinegar may have removed.
Q3: What Is The Difference Between Shoe Polish And Shoe Cream?
A3: Shoe cream contains more pigment and moisturizing agents, making it excellent for restoring color to faded areas and keeping the leather soft and conditioned. Shoe wax polish, on the other hand, is harder and is primarily used to create a protective layer and a high-gloss shine on the surface. For the best results, use cream first to nourish and color the leather, followed by wax to seal it and make it shine.
Conclusion
Cleaning and maintaining your loafers doesn’t have to be a tedious chore; rather, it is a rewarding ritual that extends the life of your footwear significantly. By identifying your material, using the right tools, and following a structured cleaning process, you ensure that your shoes always look their best.
Regular maintenance not only saves you money in the long run by delaying the need for replacements but also ensures you always step out in style. Treat your loafers with care, and they will continue to elevate your wardrobe for many years. Thanks for reading this guide on how to clean Loafers.
About
As the lead voice behind Shoenify, I bridge the gap between footwear aesthetics and technical performance. With a career dedicated to the intersection of fashion and function, I provide readers with data-driven reviews and deep dives into the global footwear market. My mission is to help every reader find the perfect fit, whether they are hitting the track or the boardroom.
Education RMIT University
-
RMIT University: Bachelor of Design (Footwear & Accessories)
-
Nottingham Trent University: MA in Fashion Design (Specializing in Footwear Innovation)
Publications and Impact
My insights on footwear trends and sustainable manufacturing have been featured in leading industry trade journals. Through Shoenify, I have influenced thousands of purchasing decisions by prioritizing transparency and rigorous testing. My work focuses on the evolution of “smart” footwear and the impact of 3D printing on the future of the industry.