

Espadrilles are a timeless symbol of summer style, bringing a touch of Mediterranean flair to any outfit. These classic shoes, known for their jute rope soles, often feature elegant laces that wrap around the ankle. While they look effortlessly chic, mastering the art of tying them can sometimes feel like a puzzle. Learning the proper technique ensures your espadrilles not only look great but also stay securely on your feet all day long.
This guide on how to tie Espadrilles will walk you through everything you need to know about tying espadrilles. From understanding different lace types to step-by-step instructions and styling tips, you’ll soon be tying your shoes like a pro. A secure and stylish tie enhances both the comfort and the aesthetic of these versatile summer staples, allowing you to walk with confidence and grace.
Types of Espadrilles That May Involve Laces
While the classic espadrille is a simple slip-on flat, many popular variations incorporate laces for both style and function. The most common type is the wedge espadrille, which often features long fabric or leather ribbons that wrap around the ankle. These laces provide crucial support for the higher heel while adding a feminine, ballet-inspired touch. You’ll also find flat espadrilles with ankle-tie laces, which offer a more secure fit than a standard slip-on and create a visually interesting detail.
Another style is the lace-up espadrille, which resembles a sneaker or an Oxford but with the characteristic jute sole. These have traditional eyelets and shorter laces, designed for a snug fit across the top of the foot rather than around the ankle. Each type uses laces differently to achieve a specific look and level of support.
Understanding Decorative vs. Functional Laces
It’s important to distinguish between decorative and functional laces on espadrilles, as this affects how you handle them. Functional laces, typically found on wedge and ankle-tie styles, are essential for keeping the shoe securely on your foot. These are usually long, sturdy ribbons or cords designed to be wrapped and tied firmly. The tension you create is key to stability, especially with a wedge heel. Without a proper tie, the shoe can slip or feel unstable, making walking uncomfortable and even hazardous.
Decorative laces, on the other hand, are purely for aesthetic purposes. They might be found on slip-on styles where a bow is pre-tied or attached to the front of the shoe without any functional purpose. Sometimes, a shoe might have short laces that tie at the ankle but don’t offer significant support. Recognizing the difference is simple: if the shoe feels loose and unstable without the laces tied, it is functional. If the shoe fits securely on its own and the laces are just an embellishment, they are decorative and don’t require a specific tying technique for security.
6 Simple Step-By-Step Guidelines on How to Tie Espadrilles
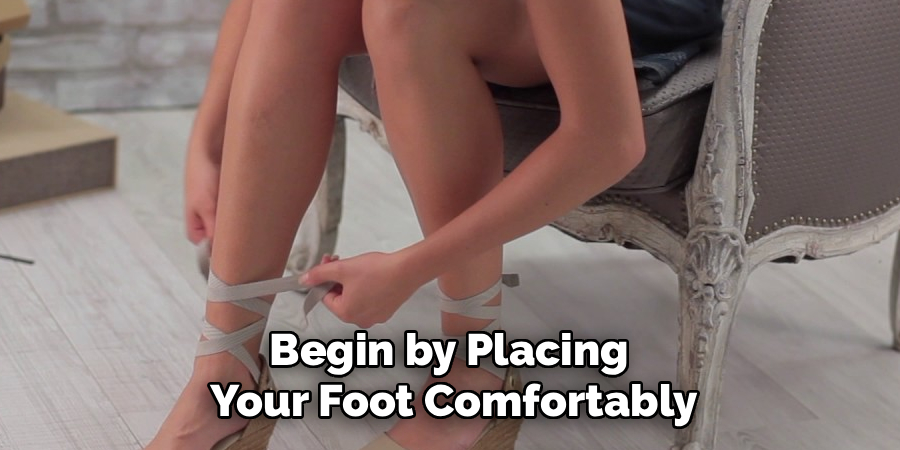
Step 1: Position the Shoe and Cross the Laces at the Front
Begin by placing your foot comfortably inside the espadrille, ensuring your heel is settled securely against the back of the shoe. Before you start wrapping, take both laces and bring them forward. Cross them over the top of your foot, right above the ankle. This initial cross is a crucial foundation for a secure tie, as it helps to anchor the shoe and prevent your foot from sliding forward. Pull the laces taut enough to feel snug but not so tight that they restrict circulation or dig into your skin.
The placement of this first cross can slightly alter the final look. For a classic appearance, cross the laces directly over the front of your ankle joint. You can also cross them slightly lower, closer to your instep, for a different visual effect. Experiment to see what feels most comfortable and looks best with your outfit. The goal is to create a stable base that will hold the rest of your wrap in place, ensuring the shoe feels like a natural extension of your foot as you prepare for the next steps.
Step 2: Wrap the Laces Behind Your Ankle
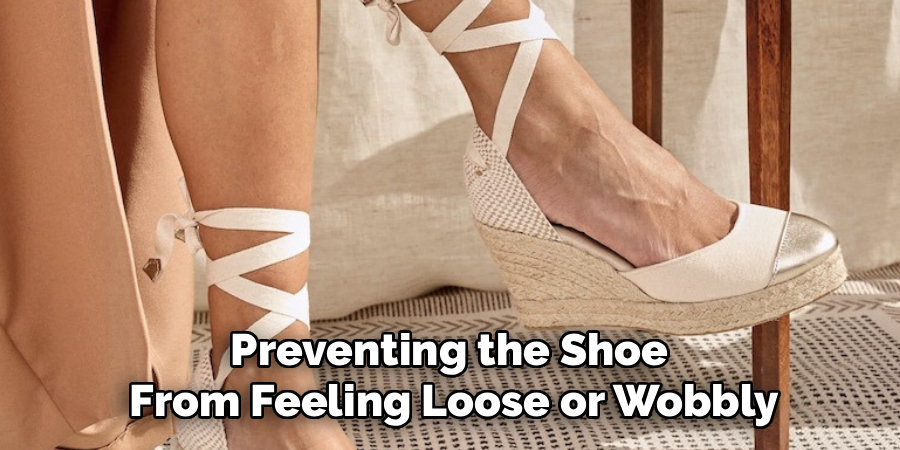
After creating the initial cross at the front, guide both laces toward the back of your ankle. As you bring them around, make sure they remain flat and untwisted. This detail is important for both comfort and appearance; twisted laces can dig into your skin and create an untidy look. Once the laces are at the back of your ankle, cross them over each other once more. This second cross, positioned over your Achilles tendon, works in tandem with the front cross to create a secure cradle around your entire ankle.
Maintain a firm, even tension as you perform this step. The wrap should feel snug and supportive, preventing any heel slippage as you walk. This is particularly vital for wedge espadrilles, where ankle stability is key to comfortable wear. Think of this step as building a supportive framework for the shoe. The double-cross technique at the front and back effectively locks your heel into place, providing the stability you need to move with confidence and preventing the shoe from feeling loose or wobbly.
Step 3: Bring the Laces Back to the Front
With the laces now crossed at the back of your ankle, bring them forward again. Guide them along the sides of your ankle, keeping them parallel to the floor and flat against your skin. This step completes the first full loop around your ankle and reinforces the secure base you have already established. As you bring them to the front for a third cross, you will position this cross just above the first one you made in Step 1. This creates a layered, crisscross pattern that is visually appealing and highly functional.
Keep the tension consistent throughout this movement. Each layer of the wrap should contribute to the overall stability of the tie. Avoid pulling too tightly, which can cause discomfort, but ensure there is no slack in the laces. By bringing them to the front again, you are preparing to build the wrap up your leg, or to secure it at the ankle, depending on the look you want to achieve. This step is about reinforcing the hold around the ankle before finalizing the tie.
Step 4: Decide on the Height of the Tie
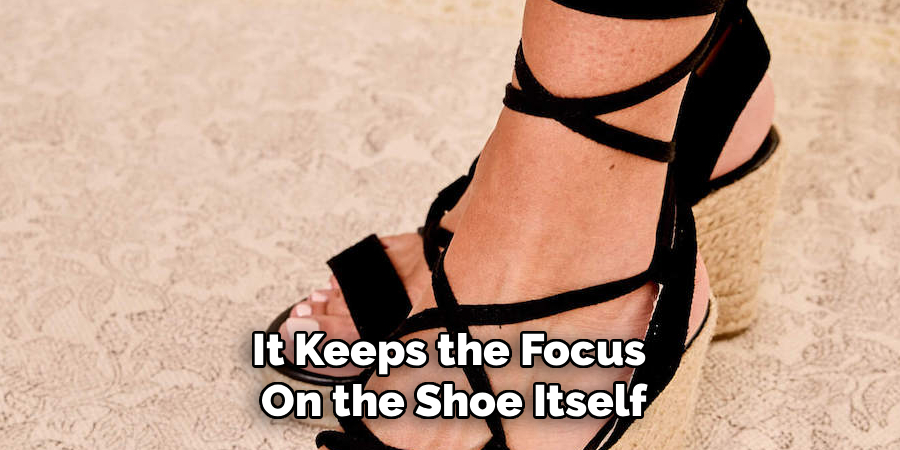
Now you have a choice to make regarding the final look: will you tie the espadrilles low at the ankle or create a higher, “gladiator-style” wrap around your calf? For a simple and classic ankle tie, you will proceed to tie a bow or knot at the front or side of your ankle after the second front cross. This look is understated, elegant, and pairs well with most outfits, including jeans, shorts, and shorter dresses. It keeps the focus on the shoe itself and is often the most practical choice for all-day wear.
If you prefer a more dramatic statement, you can continue wrapping the laces up your leg. To do this, continue to cross the laces at the front and back, moving upwards with each wrap. Keep the crosses evenly spaced to create a neat, lattice-like pattern. This style works beautifully with skirts, shorts, and dresses that show off your lower legs. The height is up to you; you can go for a subtle wrap just a few inches above the ankle or a bolder look that extends further up the calf.
Step 5: Wrap the Laces Up the Leg (Optional)
If you have opted for the higher, gladiator-style tie, continue the wrapping process up your calf. After bringing the laces to the front as described in Step 3, cross them again and wrap them around to the back. Cross them at the back and bring them forward once more, positioning this new cross an inch or two above the previous one. Repeat this crisscross motion, working your way up your lower leg. Try to keep the spacing between each layer of the wrap consistent for a polished and symmetrical appearance.
The key to a successful leg wrap is maintaining even tension without cutting off circulation. The laces should lie flat against your skin to prevent discomfort. How high you go depends on the length of your laces and your personal preference. Most espadrille laces allow for a wrap that extends about halfway up the calf. This creates a striking visual effect that draws attention and adds a bohemian or Grecian-inspired element to your look, perfect for making a fashion statement.
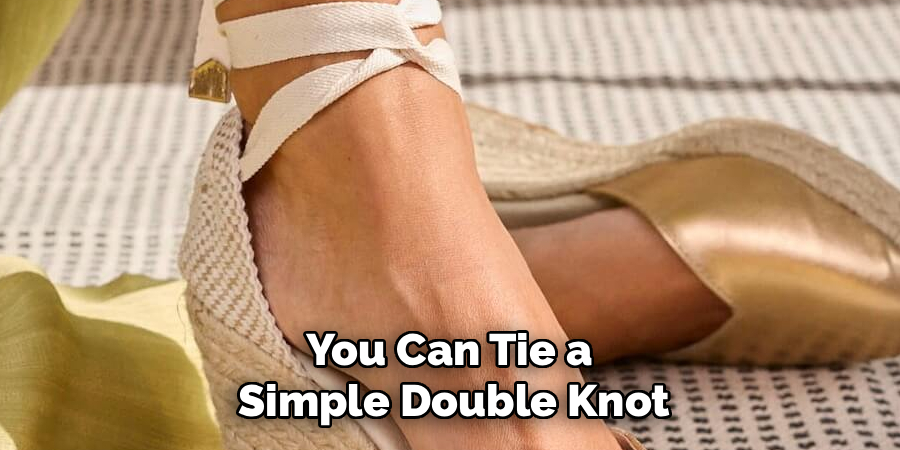
Step 6: Secure the Laces with a Knot or Bow
Once you have reached your desired height—whether at the ankle or up the calf—it’s time to secure the laces. The most common way to do this is with a simple, clean bow. A well-tied bow is not only secure but also adds a charming final touch. To prevent the knot from coming undone, you can first tie a basic square knot before creating the bow. This provides an extra layer of security, so you won’t have to stop and retie your shoes throughout the day.
Alternatively, for a more minimalist look, you can tie a simple double knot and tuck the ends of the laces discreetly under one of the wraps. The best placement for the final knot or bow is typically at the front or slightly to the side of your leg. Tying it at the very back can be awkward to execute and may come undone more easily. Once tied, give the laces a gentle tug to ensure they are secure, and you are ready to go.
Following these steps on how to tie Espadrilles will not only ensure that your shoes stay securely on your feet, but also add a stylish touch to your outfit.
Seasonal Styling Tips
Espadrilles are the quintessential shoe for warm weather. During spring and summer, pair your ankle-tie espadrilles with cropped trousers, midi skirts, or flowy sundresses to showcase the delicate lace-up detail. A wedge espadrille elevates a simple pair of shorts or a linen jumpsuit, making the outfit perfect for a brunch or an evening out.
Opt for espadrilles in neutral colors like beige, white, or navy for maximum versatility, or choose a bright color or pattern to add a playful pop to your ensemble. Don’t be afraid to match them with a classic straw bag for a coordinated, vacation-ready look.
Common Mistakes to Avoid
One of the most common mistakes is tying the laces too tightly, which can restrict circulation and leave uncomfortable marks on your skin. Conversely, tying them too loosely will cause your heel to slip and may lead to blisters or an unstable stride.
Another error is allowing the laces to twist while wrapping; always keep them flat for a comfortable and neat finish. Avoid tying the final knot at the back of your ankle, as it’s prone to coming undone. Finally, ensure the initial cross at the front is snug enough to anchor the shoe properly.
Comfort and Fit Tips
For maximum comfort, ensure your espadrilles fit correctly from the start. Your toes should have enough room to lie flat, and your heel shouldn’t slip out when you walk, even before the laces are tied. When tying, focus on achieving a secure fit around the ankle without creating pressure points.
If you plan on walking a lot, a lower ankle tie is often more comfortable than a high leg wrap. If you experience rubbing, particularly with new shoes, consider placing a small gel cushion or bandage on sensitive areas like the Achilles tendon before you start wrapping the laces.
Frequently Asked Questions
Q1: How Can I Keep My Espadrille Laces From Slipping Down My Leg?
A1: To prevent espadrille laces from slipping, the key is to create a secure anchor at the ankle before wrapping them up the leg. Ensure the initial crosses at the front and back of the ankle are firm and snug. Another effective trick is to tie a small, tight knot at the back of your ankle after the first full wrap, then continue wrapping upwards. This knot acts as a stopper. Finally, flexing your calf muscle slightly as you tie the final bow can help secure the laces against the natural curve of your leg.
Q2: Can I Replace the Laces on My Espadrilles?
A2: Yes, you can absolutely replace the laces on most espadrilles. This is a great way to customize your shoes or replace worn-out ribbons. You can purchase satin ribbons, leather cords, or patterned fabric strips from a craft or fabric store. Simply unthread the old laces and thread the new ones through the eyelets or loops on the shoe. Make sure the new laces are long enough to achieve your desired wrap style, typically at least 45-60 inches per lace for a standard ankle wrap.
Conclusion
Tying espadrilles is a simple skill that can transform both the comfort and style of your footwear. By following these steps on how to tie Espadrilles, you can create a secure and elegant tie that complements your shoes and your outfit.
Whether you prefer a simple knot at the ankle or a more dramatic wrap up the leg, the right technique ensures your espadrilles will stay put, allowing you to enjoy the summer season in style. Now that you’ve mastered the wrap, you can confidently wear these timeless shoes for any warm-weather occasion.
About
As the lead voice behind Shoenify, I bridge the gap between footwear aesthetics and technical performance. With a career dedicated to the intersection of fashion and function, I provide readers with data-driven reviews and deep dives into the global footwear market. My mission is to help every reader find the perfect fit, whether they are hitting the track or the boardroom.
Education RMIT University
-
RMIT University: Bachelor of Design (Footwear & Accessories)
-
Nottingham Trent University: MA in Fashion Design (Specializing in Footwear Innovation)
Publications and Impact
My insights on footwear trends and sustainable manufacturing have been featured in leading industry trade journals. Through Shoenify, I have influenced thousands of purchasing decisions by prioritizing transparency and rigorous testing. My work focuses on the evolution of “smart” footwear and the impact of 3D printing on the future of the industry.